Wednesday 11 December 2013

Veggie Crisps

Veggie Crisps? Yes I know it is pretty obvious that potatoes are vegetables but these crisps are not just your plain old potato crisps They are...


Beetroot, sweet potato AND potato crisps. If that isn't good enough these crisps are sooo simple to make but would look pretty impressive as a savory snack at Christmas or New Years. Or any time of year for that matter.

The recipe is easy peasy:
1. Take as many or as little of each vegetable as your heart desires (you can use any root vegetable).


2. Peel and finely slice each vegetable.


3) Put them individually on to a tray; add a dash of olive oil and a sprinkle of salt (you could add vinegar to make them salt and vinegar flavored).


4) Roast in a preheated Gas Mark 5 oven,cook the potatoes for  10 minutes and the other root vegetables for 20 minutes; making sure to turn them round half way through.


Voila! Easy peasy scrummy nibbles for any occasion done in under half an hour. (Yes I burnt the sweet potato chips a tinyy bit opps)


Sunday 1 December 2013

Gingerbread Latte

Cold days, warm buildings, snuggled up at home with a blanket surrounded by the sweet smell of cinnamon, ginger, cloves and Christmas trees. Yes, its that time of year again. The Christmas season has begun! With Christmas being my favourite time of year I thought I would try and blog at least 10 times in the lead up to Christmas as there are just to many recipes associated with Christmas to narrow them down!


What better way to start the Christmas season of than with a gingerbread latte. Carrying the sweet smells of ginger and cinnamon all in a warming mug of coffee; this is the perfect winter warmer for those cold short days. Personally gingerbread lattes are my all time favourite Starbucks drink so I thought why not try to recreate this at home. And voila that is exactly what I did.
 

I was shocked to find out just how simple it was to create this warming yummy drink. As essentially it only requires 3 simple ingredients; ginger, cinnamon and vanilla extract.

Gingerbread Latte:
*Disclaimer this recipe is not my own it has been adapted from sweethappylife.com*
Ingredients for syrup:
2 cups water
1 1/2 cups granulated sugar
2 teaspoons ground ginger
1 teaspoon ground cinnamon
1/2 teaspoon vanilla extract
Ingredients for Gingerbread latte: (1 serving)
1/2 cup of milk
1/2 cup of coffee
3-4 tablespoons of gingerbread syrup
whipped cream
Ground cinnamon (to sprinkle on top)
Method:
1. Combine the water, sugar, cinnamon and sugar in a saucepan and bring to the boil whisking continuously. 2. Reduce heat and simmer for 15 minutes stirring frequently, remover from the heat once the syrup has thickened.
 3. Remove from the heat add the vanilla extract and allow the syrup to cool before use. (Once left to cool the syrup can be stored for up to 2 months in a container in the fridge-shake well before using after the syrup has been refrigerated.)
4. Add the desired amount of syrup into a mug, pour in the milk and stir until combined. Heat the milk syrup until hot and pour back in the mug.
5. Pour the brewed coffee into the mug. 
6. Top with whipped cream and a sprinkle of cinnamon. 

This gingerbread latte went down a treat and I can guarantee I will be drinking a lot of them this during this Christmas season


Mum: "This is better than the Starbucks gingerbread Latte."


Wednesday 16 October 2013

Salted Caramel Double Chocolate Muffins

Salted caramel double chocolate muffins...jheeze that's a big name for muffins ay. But I promise you they do taste as good as they sound.


Salted Caramel is supposed to be 'fashionable' at the moment in the world of food right so I thought hay why not give it a whirl and adapt a regular chocolate muffin recipe to make it into a salted caramel double chocolate muffin recipe. Which in my opinion sounds ten times better anyway.


You can never have too much chocolate right? I have found that chopping the chocolate up into chunks tastes soooo much better than just buying chocolate buttons!

Salted Caramel Double Chocolate Muffins:
*Disclaimer: This is not my own recipe it has been adapted from the Hummingbird Bakeries chocolate muffins*
Ingredients:
200g Caster Sugar
130g Plain Flour
50g Cocoa Powder
2tsp Baking Powder
1tsp Salt
160ml Whole Milk
1tsp Vanilla Extract
170g Butter (Melted)
120g Dark Chocolate (Roughly Chopped)
4 bars of caramel chocolate (I used Cadbury bars)


Method:
1.Preheat the oven to 170C, 325F or gas mark 3.
2. Put the eggs and sugar in a bowl and whisk until pale and well combined.
3.In a separate bowl sift together the flour, cocoa, baking powder and salt. In another bowl, combine the milk and vanilla extract.
4.Gradually beat these two mixtures together alternately into the egg mixture little by little. Beat until all the ingredients are well combined.
5. Stir in the melted butter with a wooden spoon until well incorporated then stir in the chopped dark chocolate.
6. Spoon the mixture till the muffin cases are half way full. Add 2-3 squares of caramel chocolate on top of each muffin. Then add a little more mixture on top till the caramel chocolate is just covered and place any leftover caramel chocolate on top of the muffins.
7. Bake in the preheated oven for 30 minutes (it took mine more like 50 minutes) until the muffins bounce back when touched.
8. Sprinkle with the salt and leave to cool for a bit. These muffins are best enjoyed warm.

These muffins are so gooey and best enjoyed warm whilst the caramel and chocolate pieces are still melted and scrummy. However, you can heat them up if you don't eat them till after cooled and they will be just as scrummy.


Sunday 15 September 2013

Striped Birthday Cake


Birthday cakes, what flavour? how should it be iced? those are among the many questions you ask yourself when deciding on a birthday cake to make. And as it was my Mum's birthday I thought why not combine the two; chocolate and vanilla to make Lorraine Pascales zebra cake.


Although it takes a while to put the vanilla and chocolate mixture together in the tin it is well worth it and actually quite relaxing!


One thing that I would like to point out is that the cake I made has 2 layers to it so I had to double the ingredients. Yes, that's a lot of eggs! (8)

Zebra Cake:
*Disclaimer this is not my own recipe, it has been adapted from Lorraine Pascale's recipe*
Ingredients:
250ml Sunflower oil (Plus extra for greasing)
100ml Milk
4 Medium eggs
A few drops of vanilla extract
300g Self raising flour
1tsp Baking powder
25g Cocoa Powder
TIP: The recipe does say to add the zest of one orange to the chocolate mixture but we didn't have any in the house so I didn't use it, however I would definitely recommend it.
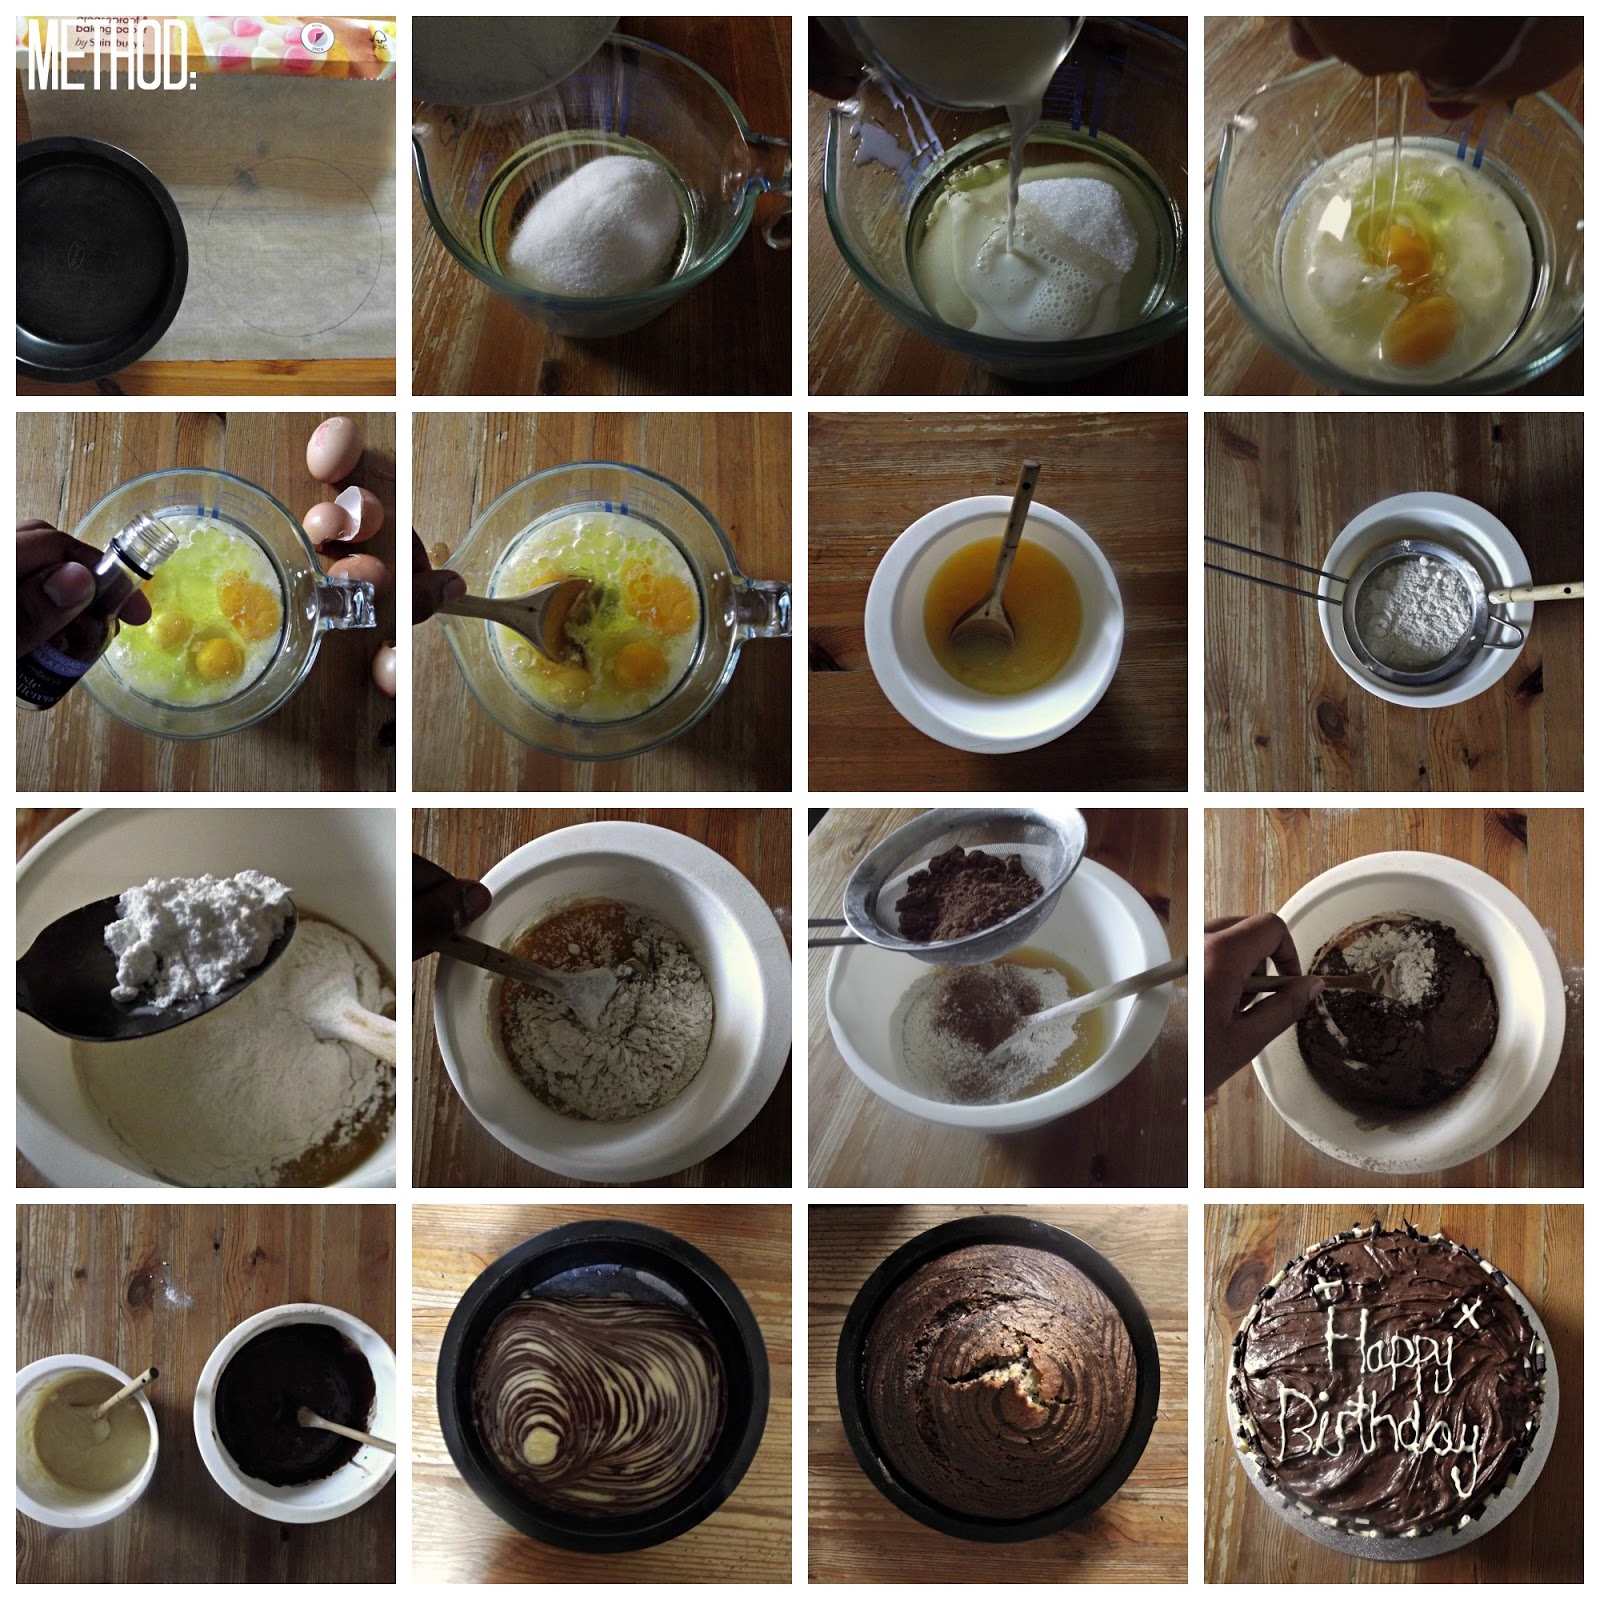
Method:
1. Preheat the oven to 180 degrees Celsius, 350 degrees Fahrenheit, gas mark 4 and line a round tin with some baking parchment and a little sunflower oil.
2. Put the oil, sugar, milk, eggs and vanilla extract together and beat with a fork until well combined.
3. Pour half the mixture (400ml/400g) into one bowl and the other half into another bowl.
4. Sift 175g of self raising flour and half a teaspoon of the baking powder into one of the bowls. Mix till well combined. This is the vanilla mixture (I added a little extra vanilla extract as well.)
5. Sift the remaining 125g of self raising flour, half a teaspoon of the baking powder and the cocoa powder. Mix till well combined. This is the chocolate mixture.
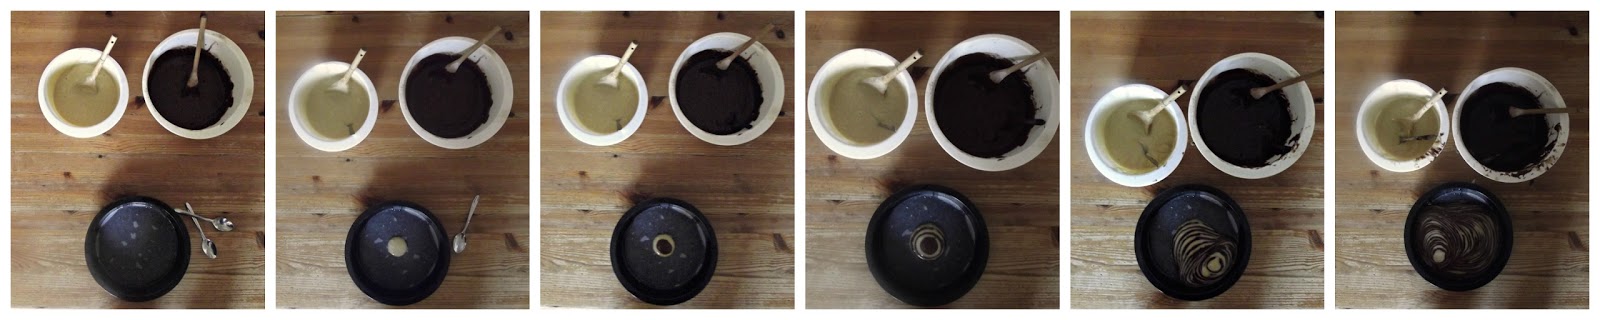
6. Put a tablespoon of the vanilla mixture into the center of greased and lined baking tin then using another tablespoon add a tablespoon of the chocolate mixture to the center of the vanilla blob. Repeat this until the mixture just touches the edge of the tin. Don't be surprised if the center moves around the tin. 
TIP: Don't use a teaspoon I did this for the first cake layer and the stripes were too thin and didn't appear very clearly so use a tablespoon.
8. Bake in the oven for 45 minutes.
9. Check if its cooked by inserting a skewer into the center of the cake. If it is remove and leave to cool if not continue to cook it for however long necessary.
10. Ice the cake or leave it plain and enjoy.


For the icing I used the hummingbird chocolate cream cheese icing for both the filling and the topping and once again I doubled it. For the top I just used melted dark and white chocolate.
Icing Recipe:
*Disclaimer, this recipe is not my own it is adapted from the hummingbird bakery*
Ingredients:
300g Icing sugar
50g Butter
125g Cream cheese
25g Cocoa Powder
Method:
1. Beat the icing sugar, cocoa powder and butter using an electric mixer until well combined.
2. Add the cream cheese and continue to beat for at least 5 minutes until well combined. Do not over beat.


You can make this cake for any occasion and I assure you it will be a success! And no one needs to know that it isn't that hard to make the strips!


Mmmm!


Tuesday 27 August 2013

Blueberry Muffins


Blueberries? Normally I'm not a fan but when incorporated into a muffin I cant get enough of them! 
Especially when they're freshly cooked and the blueberries are oozing and warm-delicious!


The best recipe I have found for blueberry muffins is the Humming Bird bakery recipe as I like there balance of blueberries to batter and you're left with a moist cake-mmm mmm! 

Blueberry Muffins:
*Disclaimer: I am not passing this of as my own recipe it has been adapted from the Hummingbird bakery recipe*
Ingredients:
360g Plain Flour 
370g Caster Sugar
1 1/2 tsp Baking Powder
1/2 tsp Bicarbonate of Soda
375ml Buttermilk
1 Egg
1 tsp Vanilla Extract
70g Butter Melted
250g Blueberries
Method:
1. Preheat the oven to 170 degrees Celsius, 320 degrees Fahrenheit or gas mark 3.
2. Put the flour, sugar, baking powder and bicarbonate of soda in a bowl and mix with a wooden spoon till all ingredients are well combined.
3. Put the buttermilk, egg and vanilla extract into a bowl and mix to combine. Slowly pour into the flour mixture and beat with a wooden spoon until all the ingredients are incorporated.
4. Pour in the melted butter and beat until the butter has just been incorporated, then beat vigorously until the dough is even and smooth.
5. Finally, gently fold in the blueberries with a wooden spoon until evenly dispersed. (I mashed a quarter of the blueberries with a fork and added them first, then the rest of the blueberries after.)
6. Spoon the mixture into the paper cases until two thirds full and bake in the preheated oven for 20-25 minutes, or until golden brown and the muffin bounces back when touched. A skewer inserted in the center should come out clean. Leave the muffins to cool in the pan before turning out onto a wire rack to cool completely. 


My favourite part was definitely adding the blueberries, I thought the contrast in colour was very pretty.


Although the recipe says that they will cook for 20-25 minutes because my muffin case were HUMONGOUS it took more like 45-50 minutes to cook them! But they still turned out just fine-thank-goodness.


 These muffins didn't last long at all in my house. I recommend dusting cinnamon on yours if you're a fan of cinnamon. Personally I absolutely love cinnamon so this went down a treat for me. Next time I might even add cinnamon into the batter! 


Monday 19 August 2013

Vanilla Glazed Doughnuts


Doughnuts, there's something so delicious about them and everyone has their personal preference; for me, personally, it has to be sugar cinnamon doughnuts or the classic vanilla glazed doughnut which I choose to make. And let me tell you that homemade doughnuts taste a thousand times better than shop bought. They smell fresh, once they've been fried they fill the whole house with the warming smell of doughnuts. And to make it even better I melted some chocolate to make as a chocolate dipping sauce to go with the doughnuts which I highly recommend you do to.


Making doughnuts is difficult? I wouldn't say so; in fact I find kneading the dough for a good 10 minutes quite therapeutic. And although you have to wait for the dough to rise a couple of times which makes it quite time consuming this is a good excuse to catch up on your favourite TV programs or read a book perhaps.


Vanilla Glazed Doughnuts: (Makes 14)
Ingredients:
3 tbsp dried active yeast
60g butter
335g strong white bread flour
3 egg yolks
1tsp vanilla extract
2tbsp granulated sugar
240ml milk warmed
Oil for frying


Method:
1.Combine the yeast, 180ml of the milk and 67g of the flour and leave to rest for 30 minutes in a warm place.
2.In a separate bowl whisk the rest of the yeast and milk with the vanilla, sugar and egg yolks until well combined.
3.Knead in the rest of the flour a little at a time until the dough is smooth and elastic. Transfer to a lightly oiled bowl-cover with cling film or a towel and leave to rest in a warm place for an hour.
4.Put the dough onto a floured surface and roll until half an inch thick. Cut out circles using 3 inch cutters (I used a mug of this length.) Cut a hole in the center of these circles using a 1 inch cutter (I used the top of a water bottle.)  Re-roll and repeat, if there are any leftover scraps roll them into separate leftover balls.
5.Cover the doughnuts with cling film and leave to rest for 20 minutes.
6.Heat a 3 inch depth of oil in a deep heavy bottomed pan until it reaches 180 C.  Use a metal spatula to transfer 3 to 4 doughnuts into the frying pan. Fry for 2 -3 minutes until golden brown, flip over and fry the other side for a further 2-3 minutes.
7.Remove from the oil using a slotted spoon and drain onto a paper towel. Repeat with the remaining doughnuts and doughnut balls.
8.Leave to cool slightly and then glaze.


Vanilla Glaze:
Ingredients:
510g icing sugar
10 tbsp milk
2 ¼  vanilla extract

Method:
1.Stir all the ingredients together in a shallow dish.
2.Dunk the doughnut into the glaze, using a spoon to help. Remove the doughnut from the glaze using a chopstick or the end of a spoon. Place onto a sheet of baking paper and leave to dry. Repeat till all doughnuts are glazed.


If I could give you one piece of advise it would be to eat these doughnuts while warm and with melted chocolate. And be quick they wont last very long!

Monday 12 August 2013

Ice Cold Mocha


Vanilla Latte, cappuccino, black coffee, cafe mocha- the list could go on! But personally for me a Cafe Mocha is definitely the best type of coffee there is around; I mean chocolate and coffee combined what could beat it?
Absolutely nothing that's what-well maybe one thing could and that's an ICED mocha, perfect for the hot weather we are having this summer. Plus, double bonus this homemade iced mocha is super creamy and super indulgent. Not ideal for trying to get that bikini body-I know- but everyone needs a cheeky snack now and then!


Coffee is simple to make and you'll be pleased to know that this iced mocha is just as simple, okay maybe a little bit harder but not by much I promise! You only need 7 ingredients for this recipe, all of which I would easily be able to eat by themselves-yes even the vanilla essence.

Ice Cold Mocha: (Makes 2)
Ingredients:
1 cup cold coffee
1 cup milk
4 tbsp whipping cream (Plus extra for the topping)
2 tsp vanilla extract
2 tsp brown sugar
4 tbsp chocolate Syrup (Plus extra for the topping)
Mocha Sugar:
2 tbsp brown sugar
1 tsp instant coffee
2 tsp coca powder

Method:
1. Put heavy cream into an electric mixer. Whip until stiff peaks form.
2. Combine sugar, coffee and cocoa powder in a shallow bowl. Rim the edge of the glasses with water then dip in the mocha sugar.
3. Fill the bottom of the glasses with 1 tbsp of chocolate syrup. Add ice cubes.
4. Pour in the coffee, milk, vanilla, sugar and cream into the glasses. Stir well.
5. Add extra cream and chocolate sauce on top.


I will pretty much guarantee that if you like chocolate and coffee you are bound to love this homemade ice mocha. And I must admit, I would say that I would happily trade a cafe bought mocha for this little treat.